Let’s say a prospective client comes to you with a furniture idea. And let’s further say that you want to land the commission in the worst kind of way. As you mull over the best way to do this, you decide to present a killer illustration to your client. And in this instance your hand drawing skills look like they never advanced beyond your time in kindergarten. But, you are pretty good with a computer, so you turn to SketchUp for help.
I have found that the key to a great SketchUp illustration is top quality textures. It is really a shame that such a great modeling tool like SketchUp comes with such a lame assortment of wood textures. This means you have to embark on a search for realism.
A Google search will help you find third party wood textures, but it has been my experience that what someone thinks is a good representation of walnut, for example, isn’t really that good. Often internet sources for wood textures don’t repeat well, are not sized to be easily applied to your model and in some instances the wood grain just doesn’t reproduce well in SketchUp. So what is the easy fix for this?
Grab Your Camera
I use two methods when choosing textures for a SketchUp model; one is easy and the other is not as easy but can yield excellent results. The harder of the two methods involves literally taking a photo of some lumber you have or see, or taking a photo of a finished piece of furniture which has a suitable surface. I’ll focus on that method first.
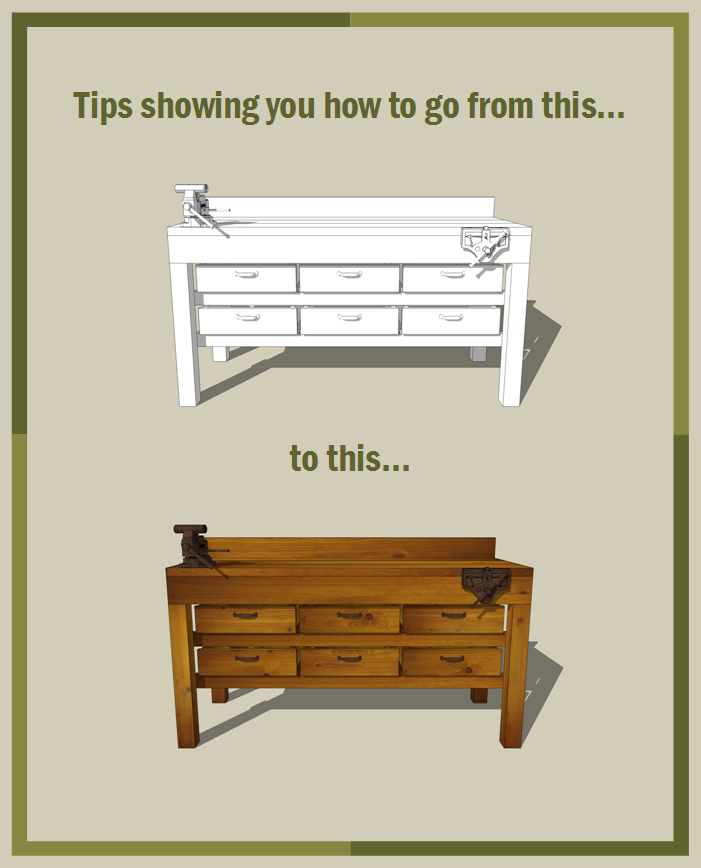
For the pine wood texture shown on the workbench above, I took a photo of the side panel on this table in my home…

The left side panel provided my best wood texture to date.
When taking a photo of a finished piece of furniture, take care to keep light reflection at a minimum. Doing so has been the biggest challenge for me. Once you have your photo, edit it as you see fit with Photoshop or some similar software. Set up a file folder in your computer for SketchUp wood textures and begin collecting photos for future use.
Begin painting your model by importing your image (click an image below to enlarge)…

Open the paint bucket material editor and begin adding your wood image by clicking the small “+” button on the upper right of the pop-up box.

Locate the image file by clicking the small file folder button on the center right of the pop-up box.

Select the file and click “open.”

Just below the file name are options which alter the size of the image. Click “OK” when done.

Open a component and paint a face with the wood texture. Note how the image repeats across the face. Right click on the component, select “Texture” then “Position”.

Using your mouse, enlarge the image by grabbing the green handle until the repeat is gone. Use the remaining handles to alter the image to suit your taste. You can also move the image for better positioning.
Once you have your image inside the paint bucket editor, add the wood texture by double clicking a component and add the texture to each face. Do this if the image isn’t large enough to cover the component face without repeating. This method is also necessary if the image isn’t oriented correctly and needs to be rotated. If the texture fills the component correctly, you can paint all the faces of the component at the same time by holding down the “Ctrl” key while clicking your mouse.

After manipulation, the wood texture looks good.
Repeat these steps for the remaining faces of the component and then the remaining components in the model.
A little planning can help make painting components easy. Correctly paint your wood texture on your first component and then where possible, alter copies of this component for the rest of the model. I ended up making a copy of the front apron and used it for the back apron. Then after exploding subsequent copies, I changed their sizes and made the side aprons.
The Easiest Way to Paint a Model
When I don’t have a suitable wood, metal or other texture, I’ll also go to Trimble’s 3D Warehouse and see what other people are using. When I put a SketchUp model in the 3D Warehouse, I am in effect saying “here is my model, use it as you wish.” But, in saying this, I am not an advocate of plagiarizing someone’s work, especially for financial gain. When in doubt attempt to contact the model creator for permission.
After locating a model with a nice texture, simply download it into your model, or store it in a separate file first. Adding the texture to your model is simple…

I find a bronze bell in the 3D Warehouse suitable for the hardware. I download the bell and set it off to the side. It is gigantic.

Choose the paint bucket tool and in the drop down menu next to the little house symbol, select In Model. This shows just the materials in your model.

With this texture, I resize it using the fields in the lower left of the menu box. I paint the whole component by holding down the Ctrl key while clicking my mouse.
Once the bronze texture is added to all of the hardware, I delete the monster size bronze bell from the model. This process is super easy, but it does require you to do a little searching through models in the 3D Warehouse.
The Completed Model
I put these images on Facebook and a friend of mine said, “Wow, that looks real!” That is the goal when making a presentation to a prospective client, or showing a furniture idea to your wife, daughter, mom, etc. A nice SketchUp model can and should be impressive.


And why did I create this model? A friend of mine acquired this workbench and since it has sentimental value, my friend asked me to create a keepsake of sorts to be given to the previous owner. The images were arranged in Microsoft Publisher. Click to enlarge.

This was a fun SketchUp project. If you have any questions about this process, ask in the comments or send me a message via my contact page.
By the way, Tim Killen’s ebook, SketchUp Guide for Woodworkers goes into more detail on this subject. Tim’s ebook is inexpensive and well worth the money (the link is not an affiliate link – I earn no commission from the sale of Tim’s ebook).
RELATED: My SketchUp Tips page
RELATED: My SketchUp Models page

So impressive! Seems like you could really do a lot with a variety of textures through SketchUp. Really like the layout of this post. 🙂
Jane – you can. I have started a collection of textures for my models and where possible take photos of other potential textures.
The wood grain makes all the difference in the world. I’ve always had one problem with sketch up and that is everything tends to look the same. That alone has kept me from using the program. Yours is a great idea.
Bill, making this model wasn’t hard to do, and adding the materials can be easy with just a few extra steps.